VSFTPD是一款小巧易用FTP服务器程序,vsftpd 在安全性、高性能及稳定性三个方面有上佳的表现。它提供的主要功能包括虚拟IP设置、虚拟用户、Standalone、inetd操作模式、强大的单用户设置能力及带宽限流等。在安全方面,它从原理上修补了大多数Wu-FTP、ProFTP,乃至BSD-FTP的安装缺陷,使用安全编码技术解决了缓冲溢出问题,并能有效避免“globbing”类型的拒绝服务攻击。目前正在使用vsftpd的官方网站有Red Hat、SuSE、Debian、GNU、GNOME、KDE、Gimp和OpenBSD等。它支持很多其他的 FTP 服务器不支持的特征。
比如:
非常高的安全性需求
带宽限制
良好的可伸缩性
创建虚拟用户的可能性
IPv6支持
中等偏上的性能
分配虚拟 IP 的可能性
高速
目录
一.ftp原理与vsftpd安装
二.设置匿名用户也支持下载和上传,创建目录
三.基于系统用户支持ftp上传和访问
四.搭建支持SSL加密传输的vftpd
五.vsftpd.conf配置详解
六.建立多个虚拟用户支持ftp不同访问权限
七.利用quota对Vsftpd做磁盘配额
(一)ftp原理与vsftp安装
1.ftp原理
FTP Transfer Protocol 件传输协议的缩写,在RFC 959中具体说明。
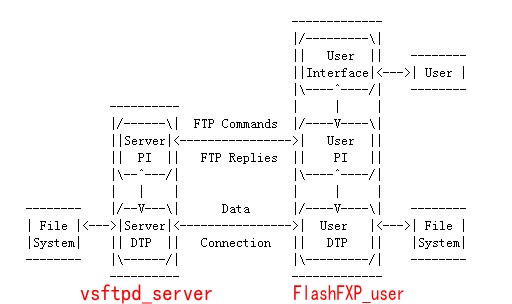
FTP会话时包含了两个通道,一个叫控制通道,一个叫数据通道。
控制通道:控制通道是和FTP服务器进行沟通的通道,连接FTP,发送FTP指令都是通过控制通道来完成的, PI称为控制连接
数据通道:数据通道是和FTP服务器进行文件传输或者列表的通道。
FTP协议中,控制连接均有客户端发起,而数据连接有两种工作方式:PORT方式和PASV方式,DTP称为数据连接
PORT模式(主动方式)
FTP 客户端首先和FTP Server的TCP 21端口建立连接,通过这个通道发送命令,客户端需要接收数据的时候在这个通道上发送PORT命令。 PORT命令包含了客户端用什么端口(一个大于1024的端口)接收数据。在传送数据的时候,服务器端通过自己的TCP 20端口发送数据。 FTP server必须和客户端建立一个新的连接用来传送数据。
PASV模式(被动方式)
在建立控制通道的时候和PORT模式类似,当客户端通过这个通道发送 PASV 命令的时候,FTP server打开一个位于1024和5000之间的随机端口并且通知客户端在这个端口上传送数据的请求,然后FTP server 将通过这个端口进行数据的传送,这个时候FTP server不再需要建立一个新的和客户端之间的连接传送数据。
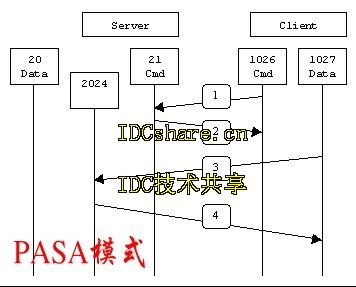
如果从C/S模型这个角度来说,PORT对于服务器来说是OUTBOUND,而PASV模式对于服务器是INBOUND,这一点请特别注意,尤其是在使用防火墙的企业里,这一点非常关键,如果设置错了,那么客户将无法连接。
2.安装vsftpd
[root@localhost /]# rpm -qa |grep vsftpd 查询是否安装了vsftpd(提示无)
[root@localhost /]# mkdir /mnt/cdrom 创建挂载光驱目录文件
[root@localhost /]# mount /dev/cdrom /mnt/cdrom/ 挂载光驱到刚创建目录
mount: block device /dev/cdrom is write-protected, mounting read-only
[root@localhost /]# cd /mnt/cdrom/Server/
[root@localhost Server]# rpm -ivh vsftpd-2.0.5-12.el5.i386.rpm 安装vsftp RPM包
warning: vsftpd-2.0.5-12.el5.i386.rpm: Header V3 DSA signature: NOKEY, key ID 37017186
Preparing... ########################################### [100%]
1:vsftpd ########################################### [100%]
[root@localhost Server]# rpm -qa |grep vsftpd再查询是否安装了vsftpd
vsftpd-2.0.5-12.el5
[root@localhost ~]# rpm -qi vsftpd 查询vsftpd详细信息
Name : vsftpd Relocations: (not relocatable)
Version : 2.0.5 Vendor: Red Hat, Inc.
Release : 12.el5 Build Date: 2007年12月13日 星期四 19时35分37秒
Install Date: 2009年12月26日 星期六 00时35分03秒 Build Host: ls20-bc1-14.build.redhat.com
Group : System Environment/Daemons Source RPM: vsftpd-2.0.5-12.el5.src.rpm
Size : 289673 License: GPL
Signature : DSA/SHA1, 2007年12月17日 星期一 23时43分34秒, Key ID 5326810137017186
Packager : Red Hat, Inc.
URL : http://vsftpd.beasts.org/
Summary : vsftpd - 非常安全 Ftp 守护进程
Description :
vsftpd 是一个非常安全 FTP 守护进程。它是完全从零开始编写的。
[root@localhost ~]# rpm -ql vsftpd 列出vsftpd中包含文件
/etc/logrotate.d/vsftpd.log vsftpd的日志文件
/etc/pam.d/vsftpd PAM认证文件
/etc/rc.d/init.d/vsftpd 启动脚本
/etc/vsftpd vsftpd的配置文件存放的目录
/etc/vsftpd/ftpusers 禁止使用vsftpd的用户列表文件
/etc/vsftpd/user_list 禁止或允许使用vsftpd的用户列表文件
/etc/vsftpd/vsftpd.conf 主配置文件
/etc/vsftpd/vsftpd_conf_migrate.sh vsftpd操作的一些变量和设置
/usr/sbin/vsftpd vsftpd的主程序
其他一些说明文档和手册文件略!
/var/ftp 匿名用户主目录
/var/ftp/pub 匿名用户的下载目录
[root@localhost /]# service vsftpd start 启动vsftpd
为 vsftpd 启动 vsftpd: [确定]
[root@localhost ~]# chkconfig --level 3 vsftpd on打开3级别随系统自动启动vsftpd
(二)设置匿名用户也支持下载和上传与创建目录
1.vsftpd的匿名用户默认只支持下载权限
[root@localhost /]# ftp 127.0.0.1 测试ftp用匿名用户登陆到本地服务器
Connected to 127.0.0.1.
220 (vsFTPd 2.0.5)
530 Please login with USER and PASS.
530 Please login with USER and PASS.
KERBEROS_V4 rejected as an authentication type
Name (127.0.0.1:root): anonymous
331 Please specify the password.
Password:
230 Login successful.
Remote system type is UNIX.
Using binary mode to transfer files.
ftp> 登陆成功(默认vsftp是开启匿名登录)
接下来测试匿名用户上传与下载
[root@localhost ~]# touch /var/ftp/pub/test.txt 先在匿名用户下载目录创建一个test.txt文件
[root@localhost /]# cd root
[root@localhost ~]# touch test1.txt 进入根目录创建一个test1.txt文件,作为上传测试
ftp> cd pub
ftp> ls
227 Entering Passive Mode (127,0,0,12,92,5)
150 Here comes the directory listing.
-rw-r--r-- 1 0 0 6 Dec 28 14:59 test.txt
226 Directory send OK.
ftp> mget test.txt 下载text.txt
mget test.txt?
227 Entering Passive Mode (127,0,0,12,123,33)
150 Opening BINARY mode data connection for test.txt (6 bytes).
226 File send OK.
6 bytes received in 0.0047 seconds (1.2 Kbytes/s)
ftp> !ls 测试是否下载到本地
anaconda-ks.cfg install.log install.log.syslog test1.txt test.txt 下载成功
ftp> put test1.txt 上传test1.txt
local: test1.txt remote: test1.txt
200 PORT command successful. Consider using PASV.
550 Permission denied. 请求被拒绝,说明没有上传权限
ftp> delete test.txt
550 Permission denied. 请求被拒绝,说明没有删除权限
2.让匿名用户支持上传功能,下载,创建目录文件的权限
要实现这个功能,必须做三件事情(测试环境是在关闭selinux情况下)
修改/etc/sysconfig/selinux文件:
#SELINUX=enforcing
SELINUX=disabled
重启生效,如果不想重启,用命令
#setenforce 0
(1)修改/etc/vsftpd/vsftpd.conf 去掉注释anon_upload_enable=YES
(2)修改/etc/vsftpd/vsftpd.conf 去掉注释anon_mkdir_write_enable=YES
以上两个步骤如下:
[root@localhost ~]# vi /etc/vsftpd/vsftpd.conf
25 # has an effect if the above global write enable is activated. Also, you will
26 # obviously need to create a directory writable by the FTP user.
27 anon_upload_enable=YES
28 #
29 # Uncomment this if you want the anonymous FTP user to be able to create
30 # new directories.
31 anon_mkdir_write_enable=YES
32 #
33 # Activate directory messages - messages given to remote users when they
34 # go into a certain directory.
35 dirmessage_enable=YES
(3)文件系统中FTP匿名用户对某个目录有写权限
[root@localhost ~]# cat /etc/passwd |grep ftp
ftp:x:14:50:FTP User:/var/ftp:/sbin/nologinà/var/ftp ftp用户的家目录 /sbin/nologin 不支持系统登录,只能作为虚拟用户用来登录vsftpd
创建一个名为put目录,并定义这个文件的所有者为ftp
[root@localhost ftp]# mkdir put
[root@localhost ftp]# chown ftp put 修改文件所有者为ftp
[root@localhost ftp]# ll
总计 8
drwxr-xr-x 2 root root 4096 2007-12-13 pub
drwxr-xr-x 2 ftp root 4096 12-29 18:13 put
[root@localhost ftp]# service vsftpd restart 重启vsftpd服务
关闭vsftpd: [确定]
为vsftpd启动vsftpd: [确定]
提示:要想让匿名用户支持删除和更名权限,必须在vsftpd.conf加入以下参数
anon_other_write_enable=YES 允许匿名账号具有删除.更名权限
[root@uhome ~]# ftp 127.0.0.1 测试结果
Connected to 127.0.0.1 (127.0.0.1).
220 (vsFTPd 2.0.5)
Name (127.0.0.1:root): anonymous
331 Please specify the password.
Password:
230 Login successful.
Remote system type is UNIX.
Using binary mode to transfer files.
ftp> ls
227 Entering Passive Mode (127,0,0,1,116,27).
150 Here comes the directory listing.
drwxrwxrwx 2 0 0 4096 Mar 05 02:28 pub
drwxrwxrwx 2 14 0 4096 Mar 05 01:31 put
226 Directory send OK.
ftp> cd put
250 Directory successfully changed.
ftp> ls
227 Entering Passive Mode (127,0,0,1,186,61).
150 Here comes the directory listing.
226 Directory send OK.
ftp> !ls
anaconda-ks.cfg install.log.syslog test.txt 模板 图片 下载 桌面
install.log test1.txt 公共的 视频 文档 音乐
ftp> put test1.txt
local: test1.txt remote: test1.txt
227 Entering Passive Mode (127,0,0,1,240,27).
150 Ok to send data.
226 File receive OK.
ftp> ls
227 Entering Passive Mode (127,0,0,1,238,74).
150 Here comes the directory listing.
-rw------- 1 14 50 0 Mar 05 02:30 test1.txt
226 Directory send OK.
(三)基于系统用户支持ftp上传和访问
1.关闭匿名用户登录 ftp支持匿名登录是不安全,所以要禁止匿名ftp登录在/etc/vsftpd/vsftpd.conf修改以下三项
anonymous_enable=NO
#anon_upload_enable=YES
#anon_mkdir_write_enable=YES
[root@red-hat-5 ~]# service vsftpd restart
关闭vsftpd: [确定]
为vsftpd启动vsftpd: [确定]
[root@red-hat-5 ~]# ftp 127.0.0.1
Connected to 127.0.0.1.
220 (vsFTPd 2.0.5)
530 Please login with USER and PASS.
530 Please login with USER and PASS.
KERBEROS_V4 rejected as an authentication type
Name (127.0.0.1:root): anonymous
331 Please specify the password. ------>提示登录失败,说明已经禁 用匿名登录
Password:
530 Login incorrect.
Login failed.
2.创建一个系统用户来登录ftp
[root@red-hat-5 ~]# useradd -s /sbin/nologin uhome
建设一个不能登录系统用户. 只用来登录ftp服务 ,这里如果没设置用户目录。默认是在home下
[root@red-hat-5 ~]# passwd uhome
Changing password for user uhome.
New UNIX password:
Retype new UNIX password:
passwd: all authentication tokens updated successfully.
[root@red-hat-5 ~]# ftp 127.0.0.1
Connected to 127.0.0.1.
220 (vsFTPd 2.0.5)
KERBEROS_V4 rejected as an authentication type
Name (127.0.0.1:root): uhome
331 Please specify the password. ------>提示登录成功
Password:
230 Login successful.
Remote system type is UNIX.
Using binary mode to transfer files.
接下来测试权限
ftp> put test.txt 上传test.txt文件成功
local: test.txt remote: test.txt
227 Entering Passive Mode (127,0,0,1,98,115)
150 Ok to send data.
226 File receive OK.
ftp> mkdir hong 创建hong目录文件成功
257 "/home/uhome/hong" created
ftp> rmdir hong 删除hong目录文件成功
250 Remove directory operation successful.
ftp> pwd 显示家目录
257 "/home/uhome"
ftp> cd /etc 切换/etc成功
250 Directory successfully changed.
ftp> mget passwd 下载passwd
mget passwd?
227 Entering Passive Mode (127,0,0,1,220,77)
150 Opening BINARY mode data connection for passwd (1429 bytes).
226 File send OK.
1429 bytes received in 5.9e-05 seconds (2.4e+04 Kbytes/s)
ftp> !ls 显示下载passwd成功
anaconda-ks.cfg install.log install.log.syslog passwd test.txt
3.加强vsftp安全设置
从以上可以看出ftp家目录存在安全漏洞,所以要修改以下设置:
(1)限制系统用户锁定在家目录
#Vi /etc/vsftpd/vsftpd.conf
去掉前面#号
chroot_list_enable=YES
chroot_list_file=/etc/vsftpd/chroot_list 限制更多系统用户
然后把所有用户加入/etc/vsftpd/chroot_list即可
[root@red-hat-5 ~]# ls /etc/vsftpd/chroot_list
默认是不存在,需要我们手动建立
[root@red-hat-5 ~]# ls /etc/vsftpd/
ftpusers user_list vsftpd.conf vsftpd_conf_migrate.sh
[root@red-hat-5 ~]# touch /etc/vsftpd/chroot_list
[root@red-hat-5 ~]# cut -d : -f 1 /etc/passwd>>/etc/vsftpd/chroot_list
把本地用户都加入到chroot_list
cut命令是切去某一列,-d是每列的分隔符,-f 是切取第几列,然后重定向到chroot文件
[root@red-hat-5 ~]# ll /etc/vsftpd/
总计 24
-rw-r--r-- 1 root root 197 12-25 19:57 chroot_list
-rw--------1 root root 125 2007-12-13 ftpusers
ftpusers指的是阻止这个文件中的用户登陆
-rw------- 1 root root 361 2007-12-13 user_list
-rw------- 1 root root 4396 12-25 19:19 vsftpd.conf
-rwxr--r-- 1 root root 338 2007-12-13 vsftpd_conf_migrate.sh
(2)限制重要系统用户不能登录ftp权限
[root@red-hat-5 ~]# cat /etc/vsftpd/ftpusers
默认会加入一些比较重要系统用户
# Users that are not allowed to login via ftp
root
bin
daemon
adm
lp
sync
shutdown
halt
mail
news
uucp
operator
games
nobody
[root@red-hat-5 ~]# echo uhome >> /etc/vsftpd/ftpusers
把之前建的uhome账号加进去测试
[root@red-hat-5 ~]# ftp 127.0.0.1
Connected to 127.0.0.1.
220 (vsFTPd 2.0.5)
KERBEROS_V4 rejected as an authentication type
Name (127.0.0.1:root): uhome
331 Please specify the password. ----->提示登录失败,说明生效了
Password:
530 Login incorrect.
Login failed.
(3)利用ftp用户策略允许登录ftp的系统用户 系统添加一个用户也默认有ftp的登陆权限,是不安全,要一个个设置,有点繁琐。利用ftp用户策略解决这个问题,即user_list文件设置,只有user_list中存在的用户才能登录系统
修改配置文件:#vi /etc/vsftpd/vsftpd.conf
在userlist_enable=YES文件后面添加
userlist_deny=NO
userlist_file=/etc/vsftpd/user_list
[root@red-hat-5 ~]# service vsftpd restart
关闭vsftpd: [确定]
为vsftpd启动vsftpd: [确定]
[root@red-hat-5 ~]# ftp 127.0.0.1
Connected to 127.0.0.1.
220 (vsFTPd 2.0.5)
KERBEROS_V4 rejected as an authentication type
Name (127.0.0.1:root): uhome
530 Permission denied. ------------->提示登录失败
Login failed.
[root@red-hat-5 ~]# echo uhome >> /etc/vsftpd/user_list
把viong账号加入到 user_list
[root@red-hat-5 ~]# ftp 127.0.0.1
Connected to 127.0.0.1.
220 (vsFTPd 2.0.5)
KERBEROS_V4 rejected as an authentication type
Name (127.0.0.1:root): uhome
331 Please specify the password. ------------->提示登录成功
Password:
230 Login successful.
Remote system type is UNIX.
Using binary mode to transfer files.
(4)设置登录ftp目标ip地址 为了让ftp更安全,我们设置ftp目标ip地址访问
C:\Users\Administrator>ifconfig 查看本地ip
...................................
以太网适配器 VMware Network Adapter VMnet1:6
连接特定的 DNS 后缀 . . . . . . . :
IPv4 地址 . . . . . . . . . . . . : 192.168.184.1
子网掩码 . . . . . . . . . . . . : 255.255.255.0
默认网关. . . . . . . . . . . . . :
只允许这个ip地址访问ftp ssh,可以写条iptable做限制.
如下:
[root@red-hat-5 ~]# iptables -A INPUT -p tcp -s 192.168.184.1 --dport 22 -j ACCEPT
允许192.168.184.1访问本地 22端口
[root@red-hat-5 ~]# iptables -A INPUT -p tcp -s 192.168.184.1 --dport 21 -j ACCEPT
允许192.168.184.1访问本地 21端口
[root@red-hat-5 ~]# iptables -A INPUT -p tcp -s 192.168.184.1 --dport 65341:65351 -j ACCEPT
允许192.168.184.1访问本地 PASV端口
[root@red-hat-5 ~]# iptables -P INPUT DROP 禁止任何输入的数据包
[root@red-hat-5 ~]# service iptables save 保存iptables设置
将当前规则保存到 /etc/sysconfig/iptables: [确定]
[root@red-hat-5 ~]# service iptables status 检查iptables的设置
表格:filter
Chain INPUT (policy DROP)
num target prot opt source destination
1 RH-Firewall-1-INPUT all -- 0.0.0.0/0 0.0.0.0/0
2 ACCEPT tcp -- 192.168.184.1 0.0.0.0/0 tcp dpt:22
3 ACCEPT tcp -- 192.168.184.1 0.0.0.0/0 tcp dpt:21
4 ACCEPT tcp -192.168.184.1 0.0.0.0/0 tcp dpts:65341:65351
(四)搭建支持SSL加密传输的vftpd
ftp传输数据是明文,弄个抓包软件就可以通过数据包来分析到账号和密码,为了搭建一个安全性比较高ftp,可以结合SSL来解决问题 SSL(Secure Socket Layer)工作于传输层和应用程序之间.作为一个中间层,应用程序只要采用SSL提供的一套SSL套接字API来替换标准的Socket套接字,就可以把程序转换为SSL化的安全网络程序,在传输过程中将由SSL协议实现数据机密性和完整性的保证.SSL取得大规模成功后,IETF将SSL作了标准化,并将其称为TLS(Transport Layer Security).Ftp结合SSL,将实现传输数据的加密,保证数据不被别人窃取.
下面我们使用linux自带的抓包工具tcpdump抓包分析,来截取ftp登录用户口令
[root@red-hat-5 vsftpd]# tcpdump -i eth0 -A |more
tcpdump: verbose output suppressed, use -v or -vv for full protocol decode
listening on eth0, link-type EN10MB (Ethernet), capture size 96 bytes
……………………………….
20:40:26.208724 IP 192.168.184.1.54516 > 192.168.184.129.ftp: S 289306029:28
9306029(0) win 8192
.............>u.....p. ..V..........
20:40:26.210838 IP 192.168.184.129.ftp > 192.168.184.1.54516: S 1292926425:1
292926425(0) ack 289306030 win 5840
E..0..@.@.H.............M.}..>u.p...S...........
20:40:26.212600 IP 192.168.184.1.54516 > 192.168.184.129.ftp: . ack 1 win 64
240
E..(m.@..................>u.M.}.P.............
20:40:26.229597 IP 192.168.184.129.ftp > 192.168.184.1.54516: P 42:48(6) ack
1 win 5840
E....2@.@...............M.~..>u.P.......220
20:40:26.251901 IP 192.168.184.1.54516 > 192.168.184.129.ftp: P 1:16(15) ack
48 win 64193
E..7m.@..................>u.M.~ P...#...USER uhome
20:40:26.251989 IP 192.168.184.129.ftp > 192.168.184.1.54516: . ack 16 win 5
840
E..(.3@.@...............M.~ .>u.P.......
20:40:26.252116 IP 192.168.184.129.ftp > 192.168.184.1.54516: P 48:82(34) ac
k 16 win 5840
E..J.4@.@...............M.~ .>u.P...8...331 Please specify the password.
20:40:26.255680 IP 192.168.184.1.54516 > 192.168.184.129.ftp: P 16:31(15) ac
k 82 win 64159
E..7m.@..................>u.M.~+P....3..PASS 123456
E..Nm......R.............:.!............ EJFDEBFEEBFACACACACACACACACACAAA.. ..
20:40:31.301262 IP 192.168.184.129.ftp > 192.168.184.1.54516: P 82:105(23) ack 31
win 5840
E..?.6@.@...............M.~+.>u.P....H..230 Login successful.
从我们抓的数据包,可以看到账号密码,所以明文传输的数据安全性太可怕了 让vsftpd支持SSL,必须让OPENSSL≥0.9.6版本,还有就是本身vsftpd版本是否支持
查询vsftpd软件是否支持SSL
[root@localhost vsftpd]# ldd /usr/sbin/vsftpd |grep libssl
libssl.so.6 => /lib/libssl.so.6 (0xf7f27000) 说明此版本支持
如没有输出libssl.so.6 => /lib/libssl.so.6 (0xf7f27000)类似文本,说明此vsftpd版本不支持SSL
[root@red-hat-5 ~]#openssl req -x509 -nodes -days 365 -newkey rsa:1024 -keyout /etc/vsftpd/vsftpd.pem -out /etc/vsftpd/vsftpd.pem 生成vsftpd.pem 证书
Generating a 1024 bit RSA private key
..++++++
....................................++++++
writing new private key to 'vsftpd.pem'
-----
You are about to be asked to enter information that will be incorporated
into your certificate request.
What you are about to enter is what is called a Distinguished Name or a DN.
There are quite a few fields but you can leave some blank
For some fields there will be a default value,
If you enter '.', the field will be left blank.
-----
Country Name (2 letter code) [GB]:cn
State or Province Name (full name) [Berkshire]: shanghai
Locality Name (eg, city) [Newbury]:shanghai
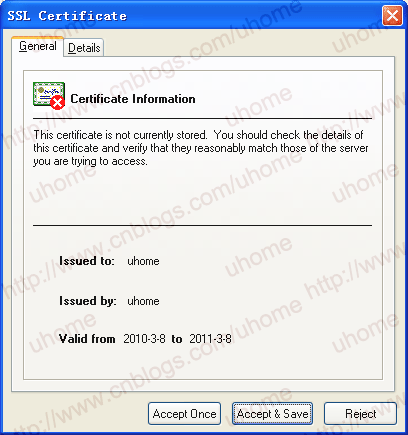
Organization Name (eg, company) [My Company Ltd]:lenovo 根据提示填写一些信息
Organizational Unit Name (eg, section) []:lenovo
Common Name (eg, your name or your server's hostname) []:uhome
Email Address []:uhome@uhome.com
[root@localhost ~]# ll /etc/vsftpd/ ==è查看是否生成vsftpd.pem文件
-rw-r--r-- 1 root root 197 12-25 19:57 chroot_list
-rw--------1 root root 125 2007-12-13 ftpusers
-rw------- 1 root root 361 2007-12-13 user_list
-rw------- 1 root root 4396 12-25 19:19 vsftpd.conf
-rwxr--r-- 1 root root 338 2007-12-13 vsftpd_conf_migrate.sh
-rw-r--r-- 1 root root 2168 01-08 01:53 vsftpd.pem 生成vsftpd.pem成功
[root@red-hat-5 ~]# vi /etc/vsftpd/vsftpd.conf 编辑主配置文件,添加以下参数
ssl_enable=YES
allow_anon_ssl=NO
force_local_data_ssl=YES
force_local_logins_ssl=YES
ssl_tlsv1=YES
ssl_sslv2=NO
ssl_sslv3=NO
rsa_cert_file=/etc/vsftpd/vsftpd.pem
下面是ssl参数一些定义,根据自己需求去修改
ssl_enable=yes/no //是否启用 SSL,默认为no
allow_anon_ssl=yes/no //是否允许匿名用户使用SSL,默认为no
rsa_cert_file=/path/to/file //rsa证书的位置
dsa_cert_file=/path/to/file //dsa证书的位置
force_local_logins_ssl=yes/no //非匿名用户登陆时是否加密,默认为yes
force_local_data_ssl=yes/no //非匿名用户传输数据时是否加密,默认为yes
force_anon_logins_ssl=yes/no //匿名用户登录时是否加密,默认为no
force_anon_data_ssl=yes/no //匿名用户数据传输时是否加密,默认为no
ssl_sslv2=yes/no //是否激活sslv2加密,默认no
ssl_sslv3=yes/no //是否激活sslv3加密,默认no
ssl_tlsv1=yes/no //是否激活tls v1加密,默认yes
ssl_ciphers=加密方法 //默认是DES-CBC3-SHA
[root@red-hat-5 ~]# service vsftpd restart
关闭vsftpd: [确定]
为vsftpd启动vsftpd: [确定]
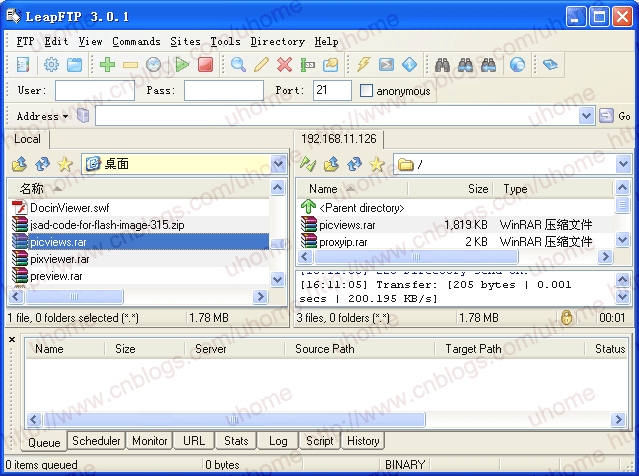
通过LeapFTP连接FTP
打开LeapFTP按F4跳出站点管理器.填写ftp目标地址并选择连接类型

(五)vsftpd.conf配置详解
1.根据 /etc/vsftpd/vsftpd.conf默认配置给出设定功能 # Example config file /etc/vsftpd/vsftpd.conf
# The default compiled in settings are fairly paranoid. This sample file
# loosens things up a bit, to make the ftp daemon more usable.
# Please see vsftpd.conf.5 for all compiled in defaults.
# READ THIS: This example file is NOT an exhaustive list of vsftpd options.
# Please read the vsftpd.conf.5 manual page to get a full idea of vsftpd's
# capabilities.
# Allow anonymous FTP? (Beware - allowed by default if you comment this out).
anonymous_enable=YES
允许匿名用户登录
# Uncomment this to allow local users to log in.
local_enable=YES
允许系统用户名登录
# Uncomment this to enable any form of FTP write command.
write_enable=YES
允许使用任何可以修改文件系统的FTP的指令
# Default umask for local users is 077. You may wish to change this to 022,
# if your users expect that (022 is used by most other ftpd's)
local_umask=022
本地用户新增档案的权限
# Uncomment this to allow the anonymous FTP user to upload files. This only
# has an effect if the above global write enable is activated. Also, you will
# obviously need to create a directory writable by the FTP user.
#anon_upload_enable=YES
允许匿名用户上传文件
# Uncomment this if you want the anonymous FTP user to be able to create
# new directories.
#anon_mkdir_write_enable=YES
允许匿名用户创建新目录
# Activate directory messages - messages given to remote users when they
# go into a certain directory.
dirmessage_enable=YES
允许为目录配置显示信息,显示每个目录下面的message_file文件的内容
# Activate logging of uploads/downloads.
xferlog_enable=YES
开启日记功能
# Make sure PORT transfer connections originate from port 20 (ftp-data).
connect_from_port_20=YES
使用标准的20端口来连接ftp
# If you want, you can arrange for uploaded anonymous files to be owned by
# a different user. Note! Using "root" for uploaded files is not
# recommended!
#chown_uploads=YES
所有匿名上传的文件的所属用户将会被更改成chown_username
#chown_username=whoever
匿名上传文件所属用户名
# You may override where the log file goes if you like. The default is shown
# below.
#xferlog_file=/var/log/vsftpd.log
日志文件位置
# If you want, you can have your log file in standard ftpd xferlog format
xferlog_std_format=YES
使用标准格式
# You may change the default value for timing out an idle session.
#idle_session_timeout=600
空闲连接超时
# You may change the default value for timing out a data connection.
#data_connection_timeout=120
数据传输超时
# It is recommended that you define on your system a unique user which the
# ftp server can use as a totally isolated and unprivileged user.
#nopriv_user=ftpsecure
当服务器运行于最底层时使用的用户名
# Enable this and the server will recognise asynchronous ABOR requests. Not
# recommended for security (the code is non-trivial). Not enabling it,
# however, may confuse older FTP clients.
#async_abor_enable=YES
允许使用\"async ABOR\"命令,一般不用,容易出问题
# By default the server will pretend to allow ASCII mode but in fact ignore
# the request. Turn on the below options to have the server actually do ASCII
# mangling on files when in ASCII mode.
# Beware that on some FTP servers, ASCII support allows a denial of service
# attack (DoS) via the command "SIZE /big/file" in ASCII mode. vsftpd
# predicted this attack and has always been safe, reporting the size of the
# raw file.
# ASCII mangling is a horrible feature of the protocol.
#ascii_upload_enable=YES
管控是否可用ASCII 模式上传。默认值为NO
#ascii_download_enable=YES
管控是否可用ASCII 模式下载。默认值为NO
# You may fully customise the login banner string:
#ftpd_banner=Welcome to blah FTP service.
login时显示欢迎信息.如果设置了banner_file则此设置无效
# You may specify a file of disallowed anonymous e-mail addresses. Apparently
# useful for combatting certain DoS attacks.
#deny_email_enable=YES
如果匿名用户需要密码,那么使用banned_email_file里面的电子邮件地址的用户不能登录
# (default follows)
#banned_email_file=/etc/vsftpd/banned_emails
禁止使用匿名用户登陆时作为密码的电子邮件地址
# You may specify an explicit list of local users to chroot() to their home
# directory. If chroot_local_user is YES, then this list becomes a list of
# users to NOT chroot().
#chroot_list_enable=YES
如果启动这项功能,则所有列在chroot_list_file中的使用者不能更改根目录
# (default follows)
#chroot_list_file=/etc/vsftpd/chroot_list
定义不能更改用户主目录的文件
# You may activate the "-R" option to the builtin ls. This is disabled by
# default to avoid remote users being able to cause excessive I/O on large
# sites. However, some broken FTP clients such as "ncftp" and "mirror" assume
# the presence of the "-R" option, so there is a strong case for enabling it.
#ls_recurse_enable=YES
是否能使用ls -R命令以防止浪费大量的服务器资源
# When "listen" directive is enabled, vsftpd runs in standalone mode and
# listens on IPv4 sockets. This directive cannot be used in conjunction
# with the listen_ipv6 directive.
listen=YES
绑定到listen_port指定的端口,既然都绑定了也就是每时都开着的,就是那个什么
standalone模式
# This directive enables listening on IPv6 sockets. To listen on IPv4 and IPv6
# sockets, you must run two copies of vsftpd whith two configuration files.
# Make sure, that one of the listen options is commented !!
#listen_ipv6=YES
pam_service_name=vsftpd
定义PAM 所使用的名称,预设为vsftpd
userlist_enable=YES
若启用此选项,userlist_deny选项才被启动
tcp_wrappers=YES
开启tcp_wrappers支持
2.过滤掉那些注释,以便我们日后修改配置,大家可以删除vsftpd.conf内容,拷贝以下:
anonymous_enable=YES
local_enable=YES
write_enable=YES
local_umask=022
#anon_upload_enable=YES
#anon_mkdir_write_enable=YES
dirmessage_enable=YES
xferlog_enable=YES
connect_from_port_20=YES
#chown_uploads=YES
#chown_username=whoever
#xferlog_file=/var/log/vsftpd.log
xferlog_std_format=YES
#idle_session_timeout=600
#data_connection_timeout=120
#nopriv_user=ftpsecure
#async_abor_enable=YES
#ascii_upload_enable=YES
#ascii_download_enable=YES
#ftpd_banner=Welcome to blah FTP service.
#deny_email_enable=YES
#banned_email_file=/etc/vsftpd/banned_emails
#chroot_list_enable=YES
#chroot_list_file=/etc/vsftpd/chroot_list
#ls_recurse_enable=YES
listen=YES
#listen_ipv6=YES
pam_service_name=vsftpd
userlist_enable=YES
tcp_wrappers=YES
为了让vsftpd的设置选项更全面, 提供一份超详细vsftpd.conf供查询参考,具体见 附件 。
(六)建立多个虚拟用户支持ftp不同访问权限
实验环境:
公司最近上了一款游戏,当游戏客户端登录到服务器有补丁更新时,是通过ftp来更新数据.所以需要建立一个普通虚拟用户账号,用于客户端登录ftp服务器更新补丁用,此账号只支持下载权限.由于平时我们也要维护服务器后台上传数据,需要建立一个专用虚拟用户账号,此账号拥有所有权限.还要把上传数据发布到普通虚拟用户家目录下,提供下载!
解决方案:
1.创建用户数据库
(1)创建用户文本文件先建立用户文本文件vsftpd_login.txt
添加两个虚拟帐号,普通帐号public和专用帐号personal
[root@red-hat-5 ~]# touch /etc/vsftpd/vsftpd_login.txt
[root@red-hat-5 ~]# echo public >>/etc/vsftpd/vsftpd_login.txt 生成public账号
[root@red-hat-5 ~]# echo PUBLIC >>/etc/vsftpd/vsftpd_login.txt 生成public密码
[root@red-hat-5 ~]# echo personal >>/etc/vsftpd/vsftpd_login.txt 生成personal账号
[root@red-hat-5 ~]# echo PERSONAL >>/etc/vsftpd/vsftpd_login.txt 生成personal密码
[root@red-hat-5 ~]# cat /etc/vsftpd/vsftpd_login.txt
Public 账号
PUBLIC 密码
Personal 账号
PERSONAL 密码
(2)生成数据库
保存虚拟帐号和密码的文本文件无法被系统帐号直接调用哈~我们需要使用db_load命令生成db口令数据库文件
db_load -T -t hash -f /etc/vsftpd/vsftpd_login.txt /etc/vsftpd/vsftpd_login.db
要使用db_load这个命令,需要安装三个文件,
db4-4.3.29-9.fc6.i386.rpm
db4-devel-4.3.29-9.fc6.i386.rpm
db4-utils-4.3.29-9.fc6.i386.rpm
[root@red-hat-5 ~]# rpm -qa|grep db4 只安装了一个
db4-4.3.29-9.fc6
[root@red-hat-5 mnt]# mount /dev/cdrom /mnt/cdrom/ 挂载光驱
mount: block device /dev/cdrom is write-protected, mounting read-only
[root@red-hat-5 cdrom]# cd Server/
[root@red-hat-5 Server]# rpm -ivh db4-devel-4.3.29-9.fc6.i386.rpm
warning: db4-devel-4.3.29-9.fc6.i386.rpm: Header V3 DSA signature: NOKEY, key ID 37017186
Preparing... ########################################### [100%]
1:db4-devel ########################################### [100%]
[root@red-hat-5 Server]# rpm -ivh db4-utils-4.3.29-9.fc6.i386.rpm
warning: db4-utils-4.3.29-9.fc6.i386.rpm: Header V3 DSA signature: NOKEY, key ID 37017186
Preparing... ########################################### [100%]
1:db4-utils ########################################### [100%]
[root@red-hat-5 Server]# cd /
[root@red-hat-5 /]# rpm -qa|grep db4
db4-4.3.29-9.fc6
db4-utils-4.3.29-9.fc6
db4-devel-4.3.29-9.fc6
[root@red-hat-5/]#db_load -T -t hash –f /etc/vsftpd/vsftpd_login.txt /etc/vsftpd/vsftpd_login.db
[root@red-hat-5 /]# ll /etc/vsftpd/
总计 48
-rw-r--r-- 1 root root 197 12-25 19:57 chroot_list
-rw------- 1 root root 126 12-25 20:06 ftpusers
-rw-r--r-- 1 root root 32 12-25 22:22 vsftpd_login.txt
-rw------- 1 root root 367 12-25 20:37 user_list
-rw------- 1 root root 4449 12-25 20:34 vsftpd.conf
-rwxr--r-- 1 root root 338 2007-12-13 vsftpd_conf_migrate.sh
-rw-r--r-- 1 root root 12288 12-25 23:12 vsftpd_login.db 生成数据库成功
-rw-r--r-- 1 root root 32 12-25 22:42 vsftpd_login.txt
-rw-r--r-- 1 root root 7 12-25 22:40 vtpd_login.txtsf
(3)修改数据库文件访问权限
数据库文件中保存着虚拟帐号的密码信息,为了防止非法用户盗取哈,我们可以修改该文件的访问权限。生成的认证文件的权限应设置为只对root用户可读可写,即600
[root@red-hat-5 /]# chmod 600 /etc/vsftpd/vsftpd_login.db
[root@red-hat-5 /]# ll /etc/vsftpd/vsftpd_login.db
-rw------- 1 root root 12288 12-25 23:12 /etc/vsftpd/vsftpd_login.db
2.配置PAM文件
为了使服务器能够使用数据库文件,对客户端进行身份验证,需要调用系统的PAM模块.PAM(Plugable Authentication Module)为可插拔认证模块,不必重新安装应用系统,通过修改指定的配置文件,调整对该程序的认证方式。PAM模块配置文件路径为/etc/pam.d/目录,此目录下保存着大量与认证有关的配置文件,并以服务名称命名。
[root@red-hat-5 /]# vi /etc/pam.d/vsftpd
#%PAM-1.0
#session optional pam_keyinit.so force revoke
#auth required pam_listfile.so item=user sense=deny file=/etc/vsftpd/ftpusers onerr=succeed
#auth required pam_shells.so
auth include system-auth
account include system-auth
session include system-auth
session required pam_loginuid.so
修改vsftpd对应的PAM配置文件/etc/pam.d/vsftpd,将默认配置使用“#”全部注释,添加相应字段
[root@red-hat-5 /]# cat /etc/pam.d/vsftpd
#%PAM-1.0
#session optional pam_keyinit.so force revoke
#auth required pam_listfile.so item=user sense=deny file=/etc/vsftpd/ftpusers onerr=succeed
#auth required pam_shells.so
#auth include system-auth
#account include system-auth
#session include system-auth
#session required pam_loginuid.so
auth required /lib/security/pam_userdb.so db=/etc/vsftpd/vsftpd_login
account required /lib/security/pam_userdb.so db=/etc/vsftpd/vsftpd_login
注意:db=/etc/vsftpd/vsftpd_login 格式是这样的,去掉.db后缀
3. 创建虚拟帐号对应的系统用户
对于普通帐号和专用帐号,因为需要配置不同的权限,所以可以将两个帐号的目录进行隔离,控制用户的文件访问。
普通帐号public对应系统帐号ftp_public,并指定其主目录为/var/ftp/public
chmod -R 500 /var/ftp/public/ :
普通帐号public只允许下载,修改public目录其他用户权限为rx可
读可执行。
专用帐号personal对应系统帐号ftp_personal,指定主目录为/var/ftp/personal
chmod -R 700 /var/ftp/ personal/ :
专用帐号personal允许上传和下载,所以对personal目录权限设置为rwx,可读可写可执行。 如果不设置可执行用户登录会出不能更改目录错误。
[root@red-hat-5 ftp]# useradd -d /var/ftp/personal/ -s /sbin/nologin ftp_personal
[root@red-hat-5 ftp]# useradd -d /var/ftp/public/ -s /sbin/nologin ftp_public
[root@red-hat-5 ftp]# ll
drwx------ 2 ftp_personal ftp_personal 4096 12-26 00:41 personal
drwxr-xr-x 2 root root 4096 12-25 09:12 pub
drwx------ 2 ftp_public ftp_public 4096 12-26 00:41 public
[root@red-hat-5 ftp]# chmod -R 500 /var/ftp/public/
[root@red-hat-5 ftp]# chmod -R 700 /var/ftp/personal/
[root@red-hat-5 ftp]# ll
总计 12
drwx------ 2 ftp_personal ftp_personal 4096 12-26 00:41 personal
drwxr-xr-x 2 root root 4096 12-25 09:12 pub
dr-x------ 2 ftp_public ftp_public 4096 12-26 00:41 public
4.建立配置文件
设置多个虚拟帐号的不同权限,若使用一个配置文件无法实现此功能,需要为每个虚拟帐号建立独立的配置文件,并根据需要进行相应的设置。
(1)修改vsftpd.conf主配置文件
配置主配置文件/etc/vsftpd/vsftpd.conf添加虚拟帐号的共同设置并添加user_config_dir字段,定义虚拟帐号的配置文件目录,并anonymous_enable=NO(修改配置)
禁用匿名用户登录
write_enable=YES (默认开启)
允许使用任何可以修改文件系统的FTP的指令
local_enable=YES (默认开启)
启用本地用户登录设置
chroot_local_enable=YES (自建配置)
将所有本地用户限制在家目录中
pam_service_name=vsftpd:(默认开启)
配置vsftpd使用的PAM模块为vsftpd
user_config_dir=/etc/vsftpd/ vsftpd_login:(自建配置)
设置虚拟帐号的主目录为/ vsftpd_login
max_clients=300:(自建配置)
设置FTP服务器最大接入客户端数为300个
max_per_ip=10: (自建配置)
设置每个IP地址最大连接数为10个
port_enable=NO (自建配置)
取消PORT模式进行数据传输
connect_from_port_20=NO (修改配置)
PORT模式进行数据传输部使用20端口
pasv_enable=YES (自建配置)
允许PASV模式进行数据传输
pasv_min_port=65341 (自建配置)
PASV模式下数据传输所使用port范围下界
pasv_max_port=65351 (自建配置)
PASV模式下数据传输所使用port范围上界
注意:主配置文件是虚拟账号共享的配置,所以主配置文件的设置对于虚拟账号是生效的
提示:每行的值都不要有空格,否则启动时会出现错误,举个例子,假如我在listen=YES后多了个空格,那我启动时就出现如下错误:500 OOPS: bad bool value in config file for: listen
(2)建立虚拟帐号配置文件
在user_config_dir指定路径下,建立与虚拟帐号同名的配置文件并添加相应的配置字段
[root@red-hat-5 vsftpd]# mkdir /vsftpd_login
[root@red-hat-5 vsftpd]# touch /etc/vsftpd/vsftpd_login/public
[root@red-hat-5 vsftpd]# touch /etc/vsftpd//vsftpd_login/personal
首先建立普通帐号public的配置文件
[root@red-hat-5 vsftpd_login]# echo guest_enable=yes >>public
[root@red-hat-5 vsftpd_login]# echo guest_username=ftp_public >>public
[root@red-hat-5 vsftpd_login]# echo anon_world_readable_only=no >>public
[root@red-hat-5 vsftpd_login]# echo anon_max_rate=50000 >>public
[root@red-hat-5 vsftpd_login]# cat public
guest_enable=yes
开启虚拟帐号登录
guest_username=ftp_public
设置ftp对应的系统帐号为ftp_public
anon_world_readable_only=no
允许匿名用户浏览器整个服务器的文件系统
anon_max_rate=50000
限定传输速率为50KB/s
注意:
vsftpd对于文件传输速度限制并不是绝对锁定在一个数值上哈,而是在80%~120%之间变化哈~比如设置100KB/s则实际是速度在80KB/s~120KB/s之间变化哈~
接着建立专用帐号的配置文件personal
[root@red-hat-5 vsftpd_login]# echo guest_enable=yes >> personal
[root@red-hat-5 vsftpd_login]# echo guest_username=ftp_personal >> personal
[root@red-hat-5 vsftpd_login]# echo anon_world_readable_only=no >> personal
[root@red-hat-5 vsftpd_login]# echo anon_mkdir_write_enable=yes >> personal
[root@red-hat-5 vsftpd_login]# echo anon_upload_enable=yes >> personal
[root@red-hat-5 vsftpd_login]# echo anon_world_readable_only=no >> personal
[root@red-hat-5 vsftpd_login]# echo anon_max_rate=50000 >> personal
[root@red-hat-5 vsftpd_login]# cat personal
guest_enable=yes:
开启虚拟帐号登录
guest_username=ftp_ personal:
设置ftp对应的系统帐号为ftp_personal
anon_other_write_enable=YES:
允许匿名账号具有删除.更名权限
anon_mkdir_write_enable=yes:
允许创建文件夹
anon_upload_enable=yes:
开启匿名帐号的上传功能
anon_world_readable_only=no
允许匿名用户浏览器整个服务器的文件系统
anon_max_rate=100000:
限定传输速度为100KB/s
[root@red-hat-5 ~]# service vsftpd restart
关闭vsftpd: [确定]
为vsftpd启动vsftpd: [确定]
如果还是连不上,建议重新启动一下系统
5.测试权限是否生效
[root@red-hat-5 viong]# ftp 127.0.0.1
Connected to 127.0.0.1.
220 (vsFTPd 2.0.5)
KERBEROS_V4 rejected as an authentication type
Name (127.0.0.1:root): public
331 Please specify the password.
Password:
230 Login successful.
Remote system type is UNIX.
Using binary mode to transfer files.
ftp> put test.txt
550 Permission denied
ftp> del public.txt
550 Permission denied.
ftp> mkdir uhome
550 Permission denied.
ftp> mget public.txt
mget public.txt?
227 Entering Passive Mode (127,0,0,1,181,255)
150 Opening BINARY mode data connection for public.txt (0 bytes).
226 File send OK.
通过测试得知public这个用户只支持下载权限,说明设置成功
C:\Users\Administrator>ftp 192.168.11.126
连接到 192.168.11.126。
220 (vsFTPd 2.0.5)
用户(192.168.11.126:(none)): personal
331 Please specify the password.
密码:
230 Login successful.
ftp> mput personal.txt
mput personal.txt?
200 PORT command successful. Consider using PASV.
150 Ok to send data.
226 File receive OK.
ftp> ls
200 PORT command successful. Consider using PASV.
150 Here comes the directory listing.
test.txt
public.txt
226 Directory send OK.
ftp: 收到 99 字节,用时 0.00秒 33.00千字节/秒。
ftp> mkdir personal
257 "/personal" created
ftp> get passsv
200 PORT command successful. Consider using PASV.
150 Opening BINARY mode data connection for passsv(2000998 bytes).
226 File send OK.
ftp: 收到 2000998 字节,用时 38.71秒 51.69千字节/秒。
ftp> delete passsv
250 Delete operation successful.
ftp> rename personal.txt ptest.txt
350 Ready for RNTO.
250 Rename successful.
通过测试得知personal这个用户支持上传.下载.删除.更改权限,说明设置成功
关于把上传数据发布到普通虚拟用户家目录下提供下载!
[root@red-hat-5 ~]# cp /var/ftp/personal/* /var/ftp/public/
把上传数据发布到普通虚拟用户家目录下提供下载
[root@red-hat-5 ~]# chown -R ftp_public.ftp_public /var/ftp/public/
更改public目录的所有者和属组为ftp_public,这样public用户才能下载
还有一种方法就是在personal配置文件加入以下两个参数
chown_uploads=YES 激活匿名用户所上传文件的修改所有权
chown_username=root 拥有匿名用户上传文件所有权的用户
然后就可以直接拷贝文件到public目录下
(七)利用quota对Vsftpd做磁盘配额
关于vsftpd磁盘配额,这里强调一下,vsftpd本身不带这个功能,是系统本身自带的quota这个软件,quota字面上就是限额的意思.
quota磁盘配额比较常见的作用:
1.避免恶意ftp用户用垃圾数据塞满宝贵的硬盘.
2.虚拟空间不同用户的容量限制
3.邮局用户的容量限制
4.多人多任务使用同一个硬盘,妥善分配系统资源
写这篇文章之前,先来个小插曲
之前参考了别人的做法,不小心犯了一个大忌。之前自己在VM装的as5。是默认分区,导致我在/etc/fstab添加了LABEL=/home /home ext3 defaults,usrquota 1 2,重启文件系统检查失败!是因为我没把home独立分区出来。
解决repair filesystem方案:
第一种情况:非正常关机引起的磁盘分区问题 不能正常进入系统
repair filesystem 1 #
非正常关机引起的,用fsck /dev/hdaX后shutdown –r now进入,或只用fsck来修复,只管y回车
第二种情况:由于/etc/fstab文件编辑错误 而引起的不能正常进入系统
解决方法就是修改/etc/fstab文件成原来正常格式 删除错误的或者是不存在的挂载目录
输入root密码登陆到修复模式,但是修复模式下(read-only system) 文件是被保护的不能修改 运行.需要把系统文件权限改成可读写(rw),如下:
(Repair filesystem) 1 # mount -o remount,rw /
使根目录可写.即可以修复/etc/fstab文件,使之可写.然后就可以vi修改了.
根据我的情况,我就直接把#LABEL=/home /home ext3 defaults,usrquota 1 2注释掉
保存退出 :x
(Repair filesystem) 1 #shutdown –r now
挂载虚拟硬盘并格式化
上面是些局外话,接下来需要在VM上添加一块2G虚拟硬盘
打开VMware点击VM---settings—add—Hard Disk—---Create a new virtual disk—SCSI—disk size(GB)2.0----重启虚拟机系统
[root@uhome ~]# fdisk -l
Disk /dev/sda: 8589 MB, 8589934592 bytes
255 heads, 63 sectors/track, 1044 cylinders
Units = cylinders of 16065 * 512 = 8225280 bytes
Device Boot Start End Blocks Id System
/dev/sda1 * 1 13 104391 83 Linux
/dev/sda2 14 1044 8281507+ 8e Linux LVM
Disk /dev/sdb: 2147 MB, 2147483648 bytes -----------说明已经生效了
255 heads, 63 sectors/track, 261 cylinders
Units = cylinders of 16065 * 512 = 8225280 bytes
先把/dev/sdb划分为一个扩展分区,再新建一个逻辑分区,格式化为ext3分区,然后设置为重启自动加载。
[root@uhome ~]# fdisk /dev/sdb
对/dev/sdb进行分区
Device contains neither a valid DOS partition table, nor Sun, SGI or OSF disklabel
Building a new DOS disklabel. Changes will remain in memory only,
until you decide to write them. After that, of course, the previous
content won't be recoverable.
Warning: invalid flag 0x0000 of partition table 4 will be corrected by w(rite)
Command (m for help): n 增加一个分区
Command action
e extended
p primary partition (1-4)
e增加扩展分区
Partition number (1-4): 1
First cylinder (1-261, default 1): 回车
Using default value 1
Last cylinder or +size or +sizeM or +sizeK (1-261, default 261): 回车
Using default value 261
Command (m for help): w保存退出
The partition table has been altered!
Calling ioctl() to re-read partition table.
Syncing disks.
[root@uhome ~]# fdisk /dev/sdb
Command (m for help): n
Command action
l logical (5 or over)
p primary partition (1-4)
l增加逻辑分区
First cylinder (1-261, default 1): 回车
Using default value 1
Last cylinder or +size or +sizeM or +sizeK (1-261, default 261): 回车
Using default value 261
Command (m for help): w
The partition table has been altered!
Calling ioctl() to re-read partition table.
Syncing disks.
[root@uhome ~]# fdisk -l
Disk /dev/sda: 8589 MB, 8589934592 bytes
255 heads, 63 sectors/track, 1044 cylinders
Units = cylinders of 16065 * 512 = 8225280 bytes
Device Boot Start End Blocks Id System
/dev/sda1 * 1 13 104391 83 Linux
/dev/sda2 14 1044 8281507+ 8e Linux LVM
Disk /dev/sdb: 2147 MB, 2147483648 bytes
255 heads, 63 sectors/track, 261 cylinders
Units = cylinders of 16065 * 512 = 8225280 bytes
Device Boot Start End Blocks Id System
/dev/sdb1 1 261 2096451 5 Extended
/dev/sdb5 1 261 2096419+ 83 Linux
[root@viong ~]# mkfs.ext3 /dev/sdb5 格式化sdb5
mke2fs 1.39 (29-May-2006)
Filesystem label=
OS type: Linux
Block size=4096 (log=2)
Fragment size=4096 (log=2)
262144 inodes, 524104 blocks
26205 blocks (5.00%) reserved for the super user
First data block=0
Maximum filesystem blocks=536870912
16 block groups
32768 blocks per group, 32768 fragments per group
16384 inodes per group
Superblock backups stored on blocks:
32768, 98304, 163840, 229376, 294912
Writing inode tables: done
Creating journal (8192 blocks): done
Writing superblocks and filesystem accounting information: done
This filesystem will be automatically checked every 25 mounts or
180 days, whichever comes first. Use tune2fs -c or -i to override.
[root@uhome ~]# mkdir /mnt/ftp
创建一个目录来挂载sdb5
[root@uhome ~]# mount /dev/sdb5 /mnt/ftp/
挂载sdb5到/mnt/ftp/
[root@uhome ~]# vi /etc/fstab
添加最后一条信息,来达到重启自动挂载上去
/dev/VolGroup00/LogVol00 / ext3 defaults 1 1
LABEL=/boot /boot ext3 defaults 1 2
tmpfs /dev/shm tmpfs defaults 0 0
devpts /dev/pts devpts gid=5,mode=620 0 0
sysfs /sys sysfs defaults 0 0
proc /proc proc defaults 0 0
/dev/VolGroup00/LogVol01 swap swap defaults 0 0
/dev/sdb5 /mnt/ftp ext3 defaults 0 0
.
最后重启系统看有没有被自动挂载上
创建一个ftp用户做测试
[root@red-hat-5 ~]# useradd -d /mnt/ftp/hom -s /sbin/nologin hom
[root@red-hat-5 ~]# passwd hom
Changing password for user hom.
New UNIX password:
Retype new UNIX password:
passwd: all authentication tokens updated successfully.
[root@red-hat-5 ~]# ll /mnt/ftp/
总计 20
drwx------ 2 hom hom 4096 01-10 17:15 hom
drwx------ 2 root root 16384 01-10 16:53 lost+found
[root@red-hat-5 ~]# service vsftpd start
为 vsftpd 启动 vsftpd:[确定]
为ftp用户做磁盘配额
刚才创建的hom用户是在/dev/sdb5分区中,那么如果我们要对hom用户进行磁盘限额,那我们需要修改/etc/fstab中根分区的记录,将/dev/sdb5分区的第4个字段改成defaults,usrquota,如下:
/dev/sdb5 /mnt/ftp ext3 defaults,usrquota 0 0
为了不然系统重启才生效,利用一下命令直接生效
# mount -o remount /dev/sdb5
对一个组进行磁配额,那我们需要增加参数grpquota,如下:
/dev/sdb5 /mnt/ftp ext3 defaults,usrquota, grpquota 0 0
[root@uhome /]# quotacheck -avug
生成每个启动了配额的文件系统的当前磁盘用量表
quotacheck: Scanning /dev/sdb5 [/mnt/ftp] quotacheck: Cannot stat old user quota file: 没有那个文件或目录
quotacheck: Old group file not found. Usage will not be substracted.
done
quotacheck: Checked 4 directories and 6 files
quotacheck: Old file not found.
注释:
-a :扫瞄所有在 /etc/mtab 里头已经 mount 的具有 quota 支持的磁盘
-u :扫瞄使用者的档案与目录
-v :显示扫瞄过程
-g :扫瞄群组使用的档案与目录
-m :强制进行 quotacheck
[root@uhome /]# edquota -u hom
为用户hom设置磁盘配额
系统会自动用
VI文本打开配额文件,如下:
Disk quotas for user hom (uid 501):
Filesystem blocks soft hard inodes soft hard
/dev/sdb5 16 0 1024 4 0 0
这里为了做测试,我把硬块限度为1024kb
注释:
Filesystem是启用了配额的文件系统的名称
blocks显示了用户当前使用的块数,单位为
KB
soft用来设置用户在该文件系统上的软块限度.使用者在宽限期间之内,他的容量可以超过 soft , 但必需要宽限时间之内将磁盘容量降低到 soft 的容量限制之下
hard用来设置用户在该文件系统上的硬块限度,绝对不能超过的容量
inodes显示了用户当前使用的i节点数量。
最后两列用来设置用户在该文件系统上的软硬i
节点限度.不同的是软限可以在一段时期内被超过。 soft 到 hard 之间的容量其实就是宽限的容量啦!可以达到针对使用者的警示作用!这段时期被称为过渡期(grace period),默认七天的超越。过渡期可以用秒钟、分钟、小时、天数、周数、或月数表示。
如果以上值中的任何一个被设置为 0,那个限度就不会被设置。
注释:
-u :编辑 user 的 quota
-g :编辑 group 的 quota
-t :编辑宽限时间(就是超过 quota 值后,还能使用硬盘的宽限期限)
-p :copy 模板(以建立好的使用者或群组)到另一个使用者(或群组)
[root@uhome /]# quotaon -avu
打开磁盘配额监控进程,u是用户g是组,这里我没设置g参数
注释:
-a :全部的 quota 设定都启动(会自动去寻找 /etc/mtab 的设定)
-u :使用者的 quota 启动
-g :群组的 quota 设定启动
-v :显示讯息
/dev/sdb5 [/mnt/ftp]: user quotas turned on
[root@uhome /]# quota -uvs hom
要校验用户的配额是否被设置
Filesystem blocks quota limit grace files quota limit grace
/dev/sdb5 16 0 1024 4 0 0
注释:
-g :显示 group 群组
-u :显示 user
-v :显示 quota 的值
-s :选择 inod 或 硬盘空间来显示
[root@uhome /]# edquota –t
设置过渡期(grace period),只针对软限制而言
Grace period before enforcing soft limits for users:
Time units may be: days, hours, minutes, or seconds
Filesystem Block grace period Inode grace period
/dev/sdb5 7days 7days
查看用户配额
*** Report for user quotas on device /dev/sdb5
Block grace time: 7days; Inode grace time: 7days
Block limits File limits
User used soft hard grace used soft hard grace
----------------------------------------------------------------------
root -- 35880 0 0 5 0 0
hom -- 16 0 1024 4 0 0
注释:
-a 列出在/etc/fstab文件里,有加入quota设置的分区的使用状况与用户和群组
-g 列出所有群组的磁盘空间限制
-u 列出所有用户的磁盘空间限制
-v 显示该用户或群组的所有空间限制
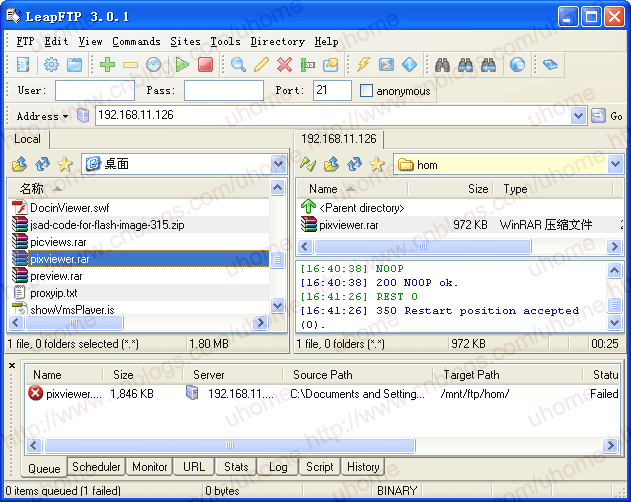
测试用户配额是否生效
下面利用LeapFTP做测试,上传一pixviewer.rar,传输到1M就失败了.说明生效了